hadoop 싱글 노드 설치 (ubuntu)-파일첨부
참고사이트 - 한가지 추가 시킨 것 외에 그대로 따라 쳐가며 문서를 작성하였습니다.
Hadoop 2.7.2 설치 & 세팅 [Single-Node Cluster]
정리를 하지 않고 웹에서 이것 저것 다운 받아가며 테스트를 했더니, 결국 뭐가 원인인지도 모른 채 더 이...
blog.naver.com
후에 추가시킬 내용
=> hive
=> python 예제 코드
logstash ruby filter elasticsearch bulk insert
input 부분
input {
    exec {
        command  => "/usr/bin/python3 /home/kimjh/Desktop/logstashQuery/01/jsonRead.py"
        interval => 120
    }
}
python 코드 부분

json 파일
=> logstash 는 ndjson 형태의 파일을 read 한다. 하지만 다음은 일반적인 json 파일이다. 이를 읽기 위해 위와 같은 파이썬 코드를 짰고 그것을 logstash의 input에 넣었다.
$ cat test_sample.json
{
        "2010": {"name2": "kim1"},
        "2011": {"name2": "kim2"},
        "2012": {"name2": "kim3"},
        "2013": {"name2": "kim4"},
        "2014": {"name2": "kim5"}
}
filter 부분
filter {
ruby {
code => '
require "elasticsearch"
require "json"
require "yaml"
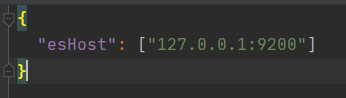
esClient = Elasticsearch::Client.new
actionArray = Array.new
jsonDatas = event.get("message")
if ! jsonDatas.nil?
jsonArry = jsonDatas.split("\n")
jsonArry.each_with_index do |n, c|
#puts n.class
strHash = YAML.load(n)
hashData = {
"index" => {
"_index" => "sleep4",
"_id" => c,
"data" => {}
}
}
hashData["index"]["data"].merge!strHash
actionArray.push(hashData)
end
end
if ! actionArray.empty?
actionArray.each do |n|
p n
end
esClient.bulk body: actionArray
end
'
}
mutate {
remove_field => ["@timestamp", "host", "command", "@version"]
}
}
1) split : 문자열 분리
=> 특정 char를 기준으로 문자열을 자르게 된다.


2) each_with_index : python 과 비교하자면 enumerate 와 동일하게 작동


3) empty?
=> 데이터가 비어있는지 확인 비어있으면 true 반환 아니면 false 반환

4) push
=> array에 데이터 삽입

'언어 > Ruby' 카테고리의 다른 글
| ruby json 파일 읽기 (0) | 2020.07.02 |
|---|---|
| ruby + elasticsearch indices/ health (0) | 2020.07.02 |
| ruby elasticsearch client (0) | 2020.05.26 |
| cea(ver3) (0) | 2016.02.27 |
| class (0) | 2016.02.27 |
자전거 여행 (중동 => 선유도 => 중동)

안양천

사실 이 사진은 집으로 복귀할 때 찍은 사진이다. 갈때는 가기 바뻐서 사진을 못찍었는데 복귀할 때 찍었다. 기억에 반대편에 신도림 역이 있었던 걸로 기억한다.

운동 1도 안하다가 갑자기 20km 를 쉬지 않고 달렸더니 편의점 도착하니까 다리가 후덜덜 하더라 ㅋㅋ


코로나 데이터 수집 (파이썬)
#주말 토이프로젝트
1] 수집 사이트
https://news.google.com/covid19/map?hl=ko&mid=%2Fm%2F02j71&gl=KR&ceid=KR%3Ako
코로나바이러스(코로나19) - Google 뉴스
Google 뉴스에서 코로나19의 영향을 받는 지역에 관한 지도, 통계, 뉴스를 확인하세요.
news.google.com
2] 그래프
: 사용그래프 (altair)
참고 : https://partrita.github.io/posts/altair/

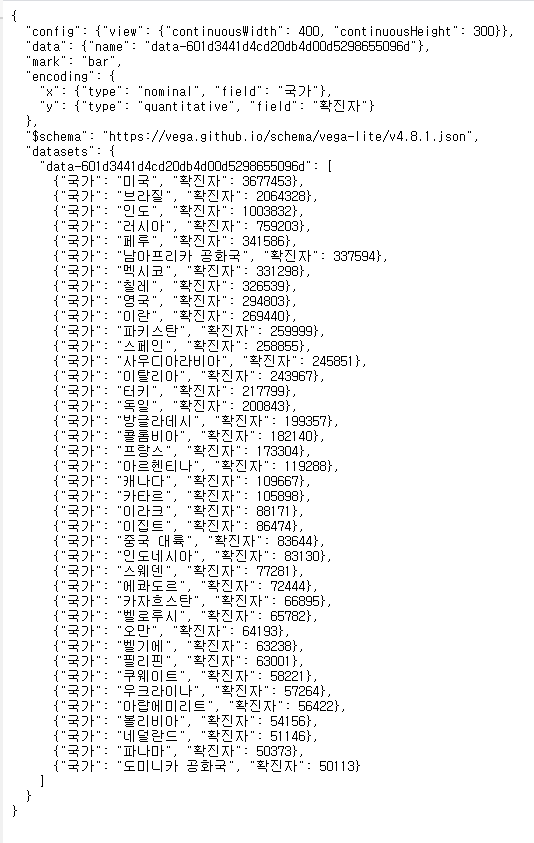
그래프 view source

vega-editor

값 수정 테스트
3] 코드 깃
https://github.com/sleep4725/Cor19
sleep4725/Cor19
Contribute to sleep4725/Cor19 development by creating an account on GitHub.
github.com
'언어 > python' 카테고리의 다른 글
| # 기초 dictionary (0) | 2020.08.21 |
|---|---|
| pandas + matplotlib 을 이용하여 tistory 방문 관련 pie 차트 그리기 (0) | 2020.08.04 |
| 네이버 python 지식인 답변 (0) | 2020.06.06 |
| 21대 국회의원 선거 크롤링 (0) | 2020.04.15 |
| pdf 변환 (0) | 2019.12.18 |
logstash ruby 활용법
전체 코드
require 'elasticsearch'

class EsTest

  attr_accessor :esClient, :action_array
  def initialize
    @esClient = Elasticsearch::Client.new
    @action_array = Array.new
  end

  def totalIndex
    ## 전체 인덱스 조회
    response   = esClient.cat.indices
    if ! response.nil?
      totalIndex = response.split("\n")
      totalIndex.each_with_index do |datas,index|
        index_name = datas.split(" ")[2]

        if index_name.chars.first != "."
          ## document가 몇개 인지 확인___________________________________________________________
          total_doc_count = esClient.count index: index_name, body: {query: {match_all:{}}}

          puts " nu: #{index}"

          action_array.push({"index"=> {"_index"=> "my_total_index","_id"=> index,"data"=> {"index_name"=> index_name,"index_count"=> total_doc_count["count"]}}})
        end
      end # end of totalIndex each
      esClient.bulk body: action_array
    end # end of nil?
  end
end

def register(params)
  @es = EsTest.new
end

def filter(event)

  event.set("work_time", Time.now.strftime("%Y%m%d"))

  if event.get("result") != "es server access error"
    @es.totalIndex
    return [event]

  else
    return [event]
  end
end
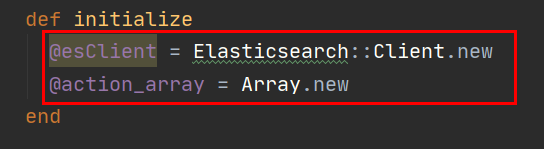
생성자
: ruby 에서 생성자는 initialize 이름의 함수로 사용된다.
=> @esClient : elasticsearch 인스턴스
=> @action_array : Array 인스턴스 ( 코드상에서 bulk 구조로 데이터를 insert 하기 위해 선언된 부분 )
=================================================================

1) esClient.cat.indices 는 전체 인덱스의 목록을 리턴해준다.
2) response.nil 은 해당 변수가 null 값인지를 물어보는 부분이다.
3) split 은 문자열을 특정 문자를 기준으로 자르게 된다. ( 자르고 리턴된 값은 Array 이다. )

4) each_with_index 는 python 에서 enumerate 하고 동일
=================================================================

1) .chars.first 는 문자열에서 첫번째 문자 즉 인덱스에서 0 에 위치에 시작하는 값이다.
'ELK > logstash' 카테고리의 다른 글
| event 처리 (0) | 2020.12.22 |
|---|---|
| 특정 필드의 값 변경 (0) | 2020.11.30 |
| logstash jdbc mssql output (0) | 2020.07.04 |
| logstash eve_odd (0) | 2020.06.17 |
| logstash file json absolute path (0) | 2020.06.17 |
java + elasticsearch highlevel rest api
참고) java는 잘 모릅니다. ㅋㅋㅋ


High level 또는 Low level을 구별짓는데 난 무슨 차이인지 아직은 명확히 모르겠다.

pom.xml 파일에 <dependencies> 안에 값? 을 넣어준다.


-> 일반적으로 자바에서 클래스 이름의 앞 머리는 대문자로 쓰는 것을 약속한다. (관습)
-> public EsTestClient() : 이부분은 생성자로써 instance 생성시 호출되면 반환타입이 없다.
--> RestClient.builder ( new HttpHost("localhost", 9200, "http") )
--> cluster의 node가 x개이면 x개 만큼 기술해주면 된다.
--> localhost : node 주소
--> 9200 : node의 tcp port 주소
--> http : elasticsearch protocol 물론 tls/ssl 설정되면 https로 바뀌어야 함

-> 자바에서 인스턴스 생성시
클래스_이름 인스턴스_이름 = new 클래스_이름();
'언어 > java' 카테고리의 다른 글
| java 크롤링 (0) | 2020.05.09 |
|---|---|
| 정올 1523 (9) (0) | 2020.05.06 |
| 정올 1338번문제 (8일차) (2) | 2020.05.03 |
| 1314 정올 (7-2) (0) | 2020.05.02 |
| 1307 정올 7일차 (0) | 2020.05.02 |
logstash jdbc mssql output
input {
	elasticsearch {
		hosts => "localhost:9200"
		index => "server_kimjh"
		query => '{ "query": { "match_all": {} } }'
		size   => 100
		scroll => "2m"
	}
}

output {
	stdout { codec => rubydebug }
	jdbc {
		connection_string => "jdbc:sqlserver://localhost:1433;databaseName=server_kimjh;user=kimjh;password=P@ssw0rd!"
		driver_jar_path => "C:/Users/EZFARM/Desktop/jar_/sqljdbc/sqljdbc4.jar"
		driver_class => "com.microsoft.sqlserver.jdbc.SQLServerDriver"
		unsafe_statement => true
		statement => ["INSERT INTO stu_info (stu_name, stu_age) VALUES(?,?)", "%{stu_name}", "%{stu_age}"]
	}
}
input 에 의해서 내려오는 결과값은 한개씩 output 으로 던진다.
input 부분
| >curl -XGET localhost:9200/server_kimjh/_mapping?pretty { "server_kimjh" : { "mappings" : { "_doc" : { "properties" : { "stu_age" : { "type" : "long" }, "stu_name" : { "type" : "text", "fields" : { "keyword" : { "type" : "keyword", "ignore_above" : 256 } } } } } } } } |
stu_age 의 field 타입은 long
stu_name 의 field 타입은 text
elasticsearch plugin
=> hosts : 노드의 개수에 따라 array로 표현하면 된다. ["https://xxx.xxx.xxx.xxx:9200", "https://xxx.xxx.xxx.xxx:9200","https://xxx.xxx.xxx.xxx:9200"]
=> query : 개인적으로 아쉬운 부분이긴한데 inline의 형태로 string 으로 입력되어야 한다.
=> size : fetch count
=> scroll : 얘는 정확히 아직 모르겠다. (pagination 처리시 필요한 것으로 일단은 파악)
output 부분
jdbc output 플러그인 사용
'ELK > logstash' 카테고리의 다른 글
| 특정 필드의 값 변경 (0) | 2020.11.30 |
|---|---|
| logstash ruby 활용법 (0) | 2020.07.07 |
| logstash eve_odd (0) | 2020.06.17 |
| logstash file json absolute path (0) | 2020.06.17 |
| logstash input-plugin (elasticsearch) (0) | 2020.05.12 |
ruby json 파일 읽기
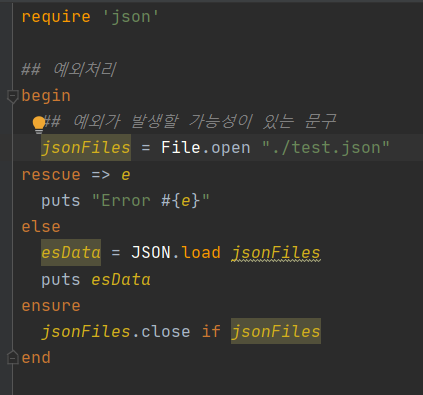
begin
# 예외가 발생할 가능성이 있는 문구
rescue => e
# 적절한 예외 처리
else
# 예외 발생없이 정상 처리
ensure
# 예외 발생과 상관없이 처리
end
======================================================
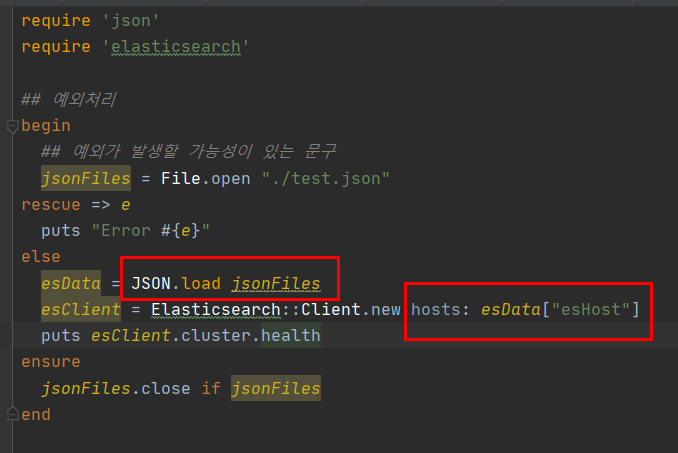
json 파일을 읽어서 elasticsearch client를 셋업해보자
'언어 > Ruby' 카테고리의 다른 글
| logstash ruby filter elasticsearch bulk insert (0) | 2020.07.22 |
|---|---|
| ruby + elasticsearch indices/ health (0) | 2020.07.02 |
| ruby elasticsearch client (0) | 2020.05.26 |
| cea(ver3) (0) | 2016.02.27 |
| class (0) | 2016.02.27 |
ruby + elasticsearch indices/ health

1. elasticsearch cluster 의 health 체크
: esClient.cluster.health => 응답으로 받은 데이터는 hash 형태의 리턴값
{"cluster_name"=>"elasticsearch", "status"=>"yellow", "timed_out"=>false, "number_of_nodes"=>1, "number_of_data_nodes"=>1, "active_primary_shards"=>15, "active_shards"=>15, "relocating_shards"=>0, "initializing_shards"=>0, "unassigned_shards"=>15, "delayed_unassigned_shards"=>0, "number_of_pending_tasks"=>0, "number_of_in_flight_fetch"=>0, "task_max_waiting_in_queue_millis"=>0, "active_shards_percent_as_number"=>50.0}
2. 전체 인덱스 확인
: esClient.cat.indices => 응답으로 받은 데이터는 string 형태의 리턴값

: shell 로 코드를 구성한다면 다음과 같다.
|
#!/bin/bash curl -XGET localhost:9200/_cat/indices?pretty |
3. document indexing

: shell 로 코드를 구성한다면 다음과 같다.
|
#!/bin/bash curl -X POST "localhost:9200/index_data" -H "Content-Type: application/json" -d' { "name": "KimJunHyeon" }' |
4. delete_by_query

: 인덱스의 껍데기 (mapping)을 유지한 상태에서 모든 document를 지워야할 경우가 생긴다. 그럴경우
delete_by_query 문을 사용한다.
: shell 로 코드를 구성한다면 다음과 같다.
| #!/bin/bash curl -X POST "localhost:9200/index_data/_delete_by_query" -H "Content-Type: application/json" -d' { "query": { "match_all": {} } }' |
'언어 > Ruby' 카테고리의 다른 글
| logstash ruby filter elasticsearch bulk insert (0) | 2020.07.22 |
|---|---|
| ruby json 파일 읽기 (0) | 2020.07.02 |
| ruby elasticsearch client (0) | 2020.05.26 |
| cea(ver3) (0) | 2016.02.27 |
| class (0) | 2016.02.27 |
logstash eve_odd
json file ==============================================================
{"num": 11}
{"num": 12}
{"num": 13}
{"num": 14}
{"num": 15}
{"num": 16}
ruby file ==============================================================
def register( params )
    #empty
end

def filter( event )
    remainder = event.get("remainder")
    if remainder == 0
        event.set("num_result", "even_number")
        return [ event ]
    else
        event.set("num_result", "odd_number" )
        return [ event ]
    end
end
logstash conf ==============================================================
input {

    file {
        path           => "/home/kimjh/Desktop/ruby_proj/stu_01.dir/1050.json"
        codec          => "json"
        start_position => "beginning"
        sincedb_path   => "/dev/null"
    }
}

filter {

    ruby {
        code => 'remainder = event.get("num")%2;
                 event.set("remainder", remainder)'
    }

    ruby {
        path => "/home/kimjh/Desktop/ruby_proj/stu_01.dir/1050.rb"
    }

    mutate {
        remove_field => ["@timestamp", "@version", "host", "path", "remainder"]
    }
}

output {

    stdout {
        codec => rubydebug
    }
}
결과 ==============================================================

'ELK > logstash' 카테고리의 다른 글
| logstash ruby 활용법 (0) | 2020.07.07 |
|---|---|
| logstash jdbc mssql output (0) | 2020.07.04 |
| logstash file json absolute path (0) | 2020.06.17 |
| logstash input-plugin (elasticsearch) (0) | 2020.05.12 |
| logstash plugin install (0) | 2020.04.15 |
